Preamble
In this material I will show you how to compare two databases in Microsoft SQL Server with the possibility of further synchronization, while showing a simple way that does not require writing complex instructions in T-SQL.
Why compare and synchronize databases?
I will start with the fact that you can compare and synchronize not only data, but also objects on SQL Server, such as procedures, functions, indexes and so on, ie you can compare the whole scheme, the structure of the database.
In fact, there may be many reasons to compare two databases in Microsoft SQL Server, here are some possible scenarios:
- Let’s say you have several databases with a similar structure, making changes that are not clearly controlled, such as test bench and industrial databases.
- Or, you just need to compare and synchronize data from two databases that do not have replication, but the data in one database was made and the data in the other was not made.
- Another possible situation is that there are several branches, whose databases are accompanied by local developers who can make unregulated changes (add / delete a column in the table, create an index, etc.), and when it comes to the fact that the databases must be absolutely identical, there are serious problems.
- It is also possible that you have several absolutely identical databases, but for some unknown reasons their performance is different, and in order to find out what the reason is, it is necessary to compare these databases.
- You may have another reason why you need to compare the data or structure of two databases, it’s possible to do it anyway and I’ll tell you how.
Database comparison and synchronization in Microsoft SQL Server
In order to compare and synchronize databases in Microsoft SQL Server, you need to write certain instructions in T-SQL, which can cause problems, as many simply do not know enough T-SQL.
Even for programmers who are able to do this, it will be quite difficult to implement it due to the labor intensity of such a task. And if such a task is a one-time one, it may even seem senseless to spend so much effort on comparison.
But due to the fact that the task of comparison and synchronization of databases is widespread, it has affected the creation of special automated tools for comparison and synchronization of databases, in other words, you do not need to write complex instructions, because there are special tools that have a convenient and simple interface.
Comparison programs and database synchronization in Microsoft SQL Server
There are not so many tools for comparing and synchronizing databases, and almost all of them are paid. Today I will tell you about Devart software products, namely those designed for comparing SQL Server databases.
They have a low cost compared to the functionality they provide, and most importantly, they have a free full-function trial version for 30 days, which will allow you to test the tools and make a decision about buying. And if you have a one-time task, it turns out that this is an absolutely free for you database comparison tool.
Devart has the following database comparison and synchronization programs in Microsoft SQL Server:
- dbForge Data Compare for SQL Server is a tool for comparing and synchronizing data in Microsoft SQL Server databases;
- dbForge Schema Compare for SQL Server is a tool for comparing and synchronizing database schemas in Microsoft SQL Server;
- dbForge Compare Bundle for SQL Server is a suite of tools that contains the above two programs for complex comparison of databases, while it is cheaper to buy this package.
It should also be noted that these tools allow not only to compare and display the results in the program interface, but also generate reports based on the analysis, and upload them to Excel or HTML format, which, in my opinion, is very convenient.
Today, as an example, I will tell you how to compare data from two Microsoft SQL Server databases, I will use dbForge Compare Bundle for SQL Server, because it includes, as I have already mentioned, both Data Compare and Schema Compare, personally, both tools will be useful to me, so I will download and install Compare Bundle for SQL Server package.
Among other things, this package also includes plug-ins for SQL Server Management Studio, which adds another plus to this package.
Input data for example
To clearly show you how the data comparison process works, I will create two separate test databases. I will add a couple of tables to them and fill them with data that will be slightly different.
Below is a complete guide to creating two databases with data to compare.
--Creation of database 1
CREATE DATABASE TestDB1;
GO
USE TestDB1;
GO
--Creation of the Goods table
CREATE TABLE Goods (
ProductId INT IDENTITY(1,1) NOT NULL CONSTRAINT PK_ProductId PRIMARY KEY,
Category INT NOT NULL DEFAULT (1),
ProductName VARCHAR(100) NOT NULL,
Price MONEY NULL,
);
GO
--Creation of Categories Table
CREATE TABLE Categories (
CategoryId INT IDENTITY(1,1) NOT NULL CONSTRAINT PK_CategoryId PRIMARY KEY,
CategoryName VARCHAR(100) NOT NULL
);
GO
--Adding a foreign key restriction (FOREIGN KEY)
ALTER TABLE Goods ADD CONSTRAINT FK_Category
FOREIGN KEY (Category)
REFERENCES Categories (CategoryId)
ON DELETE SET DEFAULT
ON UPDATING NO ACTION;
GO
--Adding rows to the Categories table
INSERT INTO Categories (CategoryName)
VALUES ("PC Accessories"),
("Cell Phones")
("Household Appliances")
GO
--Adding rows to the Goods table
INSERT INTO Goods(Category, ProductName, Price)
VALUES (1, 'System Block', 300),
(1, 'Monitor', 200),
(2, 'Smartphone', 100);
GO
-------------------------------------------------------------------------
--Database creation 2
CREATE DATABASE TestDB2;
GO
USE TestDB2;
GO
--Creation of the Goods table
CREATE TABLE Goods (
ProductId INT IDENTITY(1,1) NOT NULL CONSTRAINT PK_ProductId PRIMARY KEY,
Category INT NOT NULL DEFAULT (1),
ProductName VARCHAR(100) NOT NULL,
Price MONEY NULL,
);
GO
--Creation of Categories Table
CREATE TABLE Categories (
CategoryId INT IDENTITY(1,1) NOT NULL CONSTRAINT PK_CategoryId PRIMARY KEY,
CategoryName VARCHAR(100) NOT NULL
);
GO
--Adding a foreign key restriction (FOREIGN KEY)
ALTER TABLE Goods ADD CONSTRAINT FK_Category
FOREIGN KEY (Category)
REFERENCES Categories (CategoryId)
ON DELETE SET DEFAULT
ON UPDATING NO ACTION;
GO
--Adding rows to the Categories table
INSERT INTO Categories (CategoryName)
VALUES ("PC Accessories"),
("Cell Phones")
GO
--Adding rows to the Goods table
INSERT INTO Goods(Category, ProductName, Price)
VALUES (1, 'System Block', 300),
(1, 'Monitor', 250);
GO
--data sampling
SELECT * FROM TestDB1.dbo.Goods;
SELECT * FROM TestDB2.dbo.Goods;
As you can see, the data in Goods tables is distinguished by two rows, one row is simply not in the second database, and the second difference is that in the Price column the value is different (in one database 200, in the other 250). In addition, the Categories table also differs in one row.
So, we have the task of finding these differences, it is assumed that we do not know them, and the database is large, there are a lot of tables and data. I created two simple tables just so that you can clearly see these changes so that you can see where you need to look.
Installing dbForge Compare Bundle for SQL Server
First let’s download and install this program, although the installation process of Compare Bundle for SQL Server is not complicated.
Step 1 – Download the program distribution kit
You can download the program on the official website, on the download page, here it is – https://www.devart.com/dbforge/sql/compare-bundle/download.html.
I choose the Professional version, and I click “Download.”
The result will be a file with the size of about 70 megabytes.
Step 2 – Installing Compare Bundle for SQL Server on Windows 10
I will install it on Windows 10.
Start the downloaded file and in the first window click “Install”.
Note! Since the dbForge Compare Bundle for SQL Server toolkit includes extensions for SSMS, SQL Server Management Studio must be closed during the installation.
Step 3 – Choosing a catalogue for installation
If necessary, at this step you can change the directory where the program should be installed. Press “NEXT”.
Step 4 – Selection of components
Here we leave it as default, because we are offered to select the programs to be installed, we need everything, so click “NEXT”.
Step 5 – Finishing the installation
The installation is completed when a message appears. Press “Finish”.
Comparison and synchronization of data using dbForge Data Compare for SQL Server
To start comparing data, run dbForge Data Compare for SQL Server, it can compare: tables, views, database backups and even arbitrary queries.
You can launch the program from the “Start” menu. Also in the SSMS object browser in the context menu of databases there will be new items with which you can run extensions to work with these programs in SQL Server Management Studio environment.
Note!
At startup the program will be every time, before buying a license, we say that it will be valid for 30 days. We just close this window. In case you often need to compare and synchronize databases, I advise you to purchase a license.
Configuring the connection to Microsoft SQL Server
First let’s configure a connection to Microsoft SQL Server, to do this click “New Connection…” in the “Database” menu.
Then in the window that opens, configure the connection, in my case it’s pretty simple, I select the local server, and I specify Windows authentication. Click “OK” (you can click on Test Connection to verify the connection in advance).
By the way, dbForge Data Compare for SQL Server supports almost all versions of SQL Server since 2000. Here I used Microsoft SQL Server 2017 in the Express edition.
Comparison of databases
To start the data comparison, press the “New Data Comparison…” button.
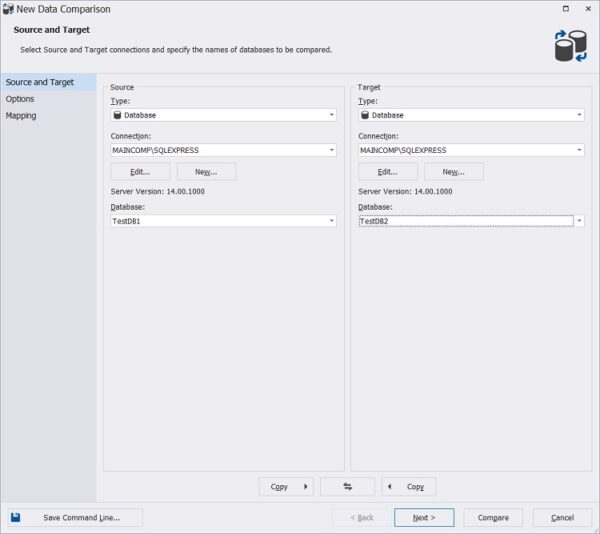
Next, specify the source database (Source) and the target database (Target) that we will compare.
- The Source database is the main database that we will be comparing against;
- The Target Database is the database that you want to compare and synchronize with the Source Database, i.e. make it the same as the Source.
The source database is configured on the left, the target database is configured on the right. To configure it, you need to specify:
- Type – what we are comparing, by default, the databases;
- Connection – specify the connection to the server, since the databases may be on different servers;
- Database – select the desired database.
My source database is TestDB1 and the target database is TestDB2.
Click “Next”.
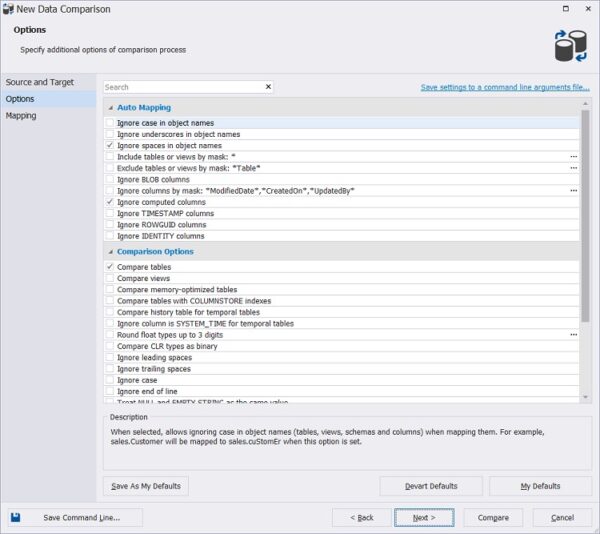
Next, we can specify the necessary options for comparison, click “Next”.
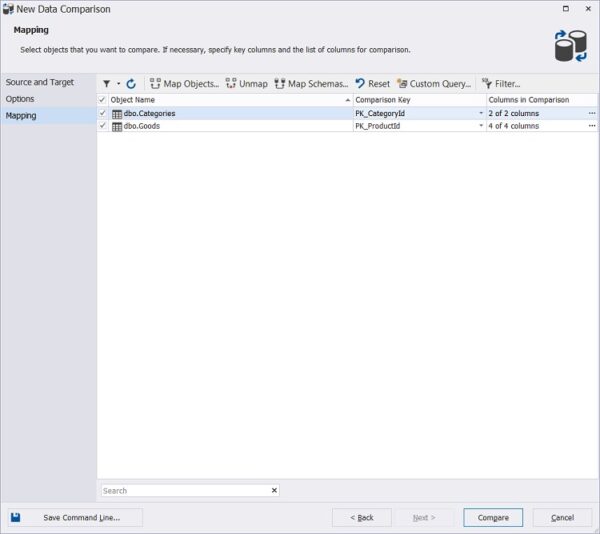
The program will analyze available tables in databases and will list them, if some tables do not need to be compared, you can uncheck them. In my test case, I leave everything as there are only two.
Click “Compare”.
Then the comparison process will start and its duration will depend on the size of the databases. In my case, the comparison lasted no longer than a second.
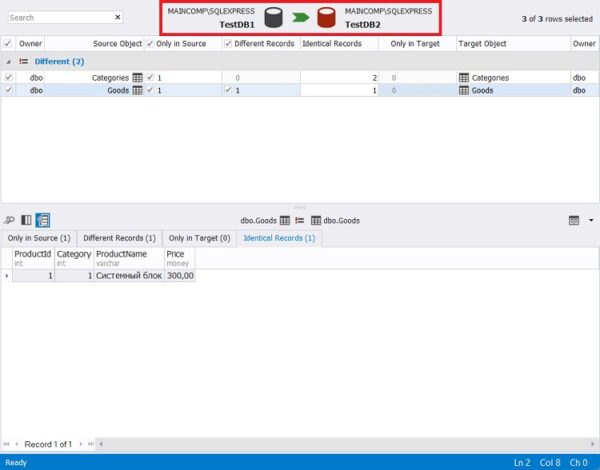
The result of the comparison will be displayed on the screen.
The top part of the screen will display the list of tables and the summary data for these tables.
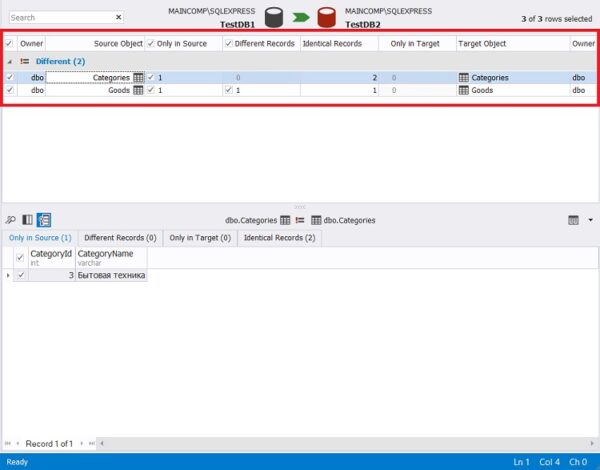
To view the details, simply select the desired table and the detailed data will be displayed at the bottom.
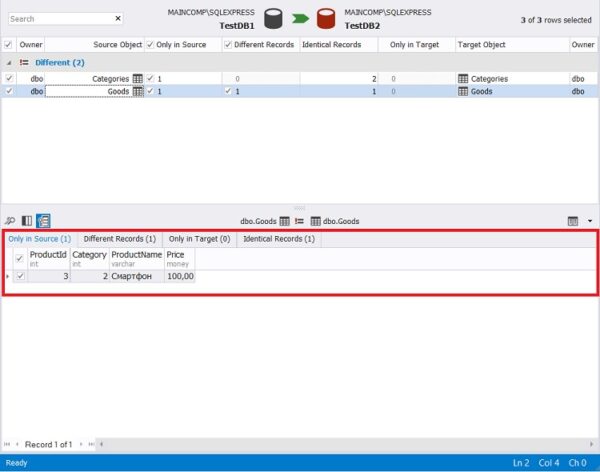
There are 4 tabs.
Only in Source – these data are only in the source, in the target database they are not. In my case, if you remember, in the Goods table of the TestDB1 database there is one row more. The result is that we see one more line on this tab.
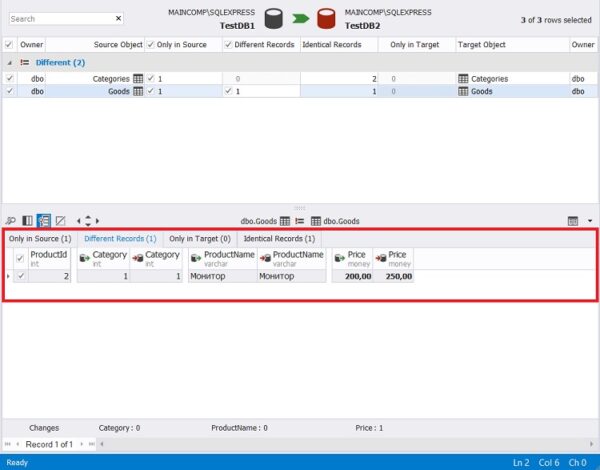
Different Records are strings that are different. We had a single value in the Price column, so this tab shows this row and shows the value in both the source and target tables, which is very convenient.
Only in Target – these data are only in the target table, i.e. they are not in the source. I have an empty table there, as I have not reproduced such a scenario.
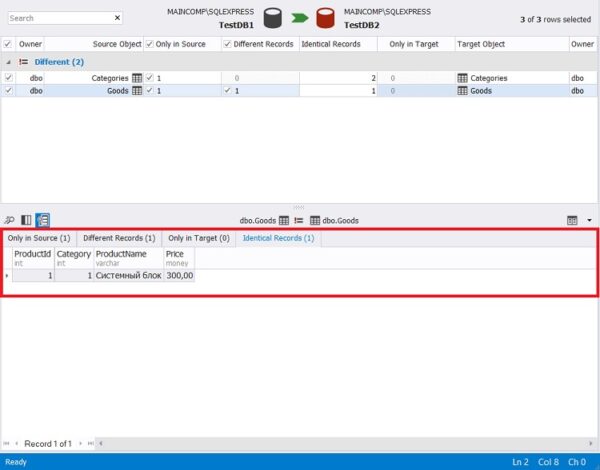
Identical Records are the same rows, i.e. they are absolutely identical in both databases. I have such strings, or rather one line, it is in TestDB1 and TestDB2.
Generating and uploading a report
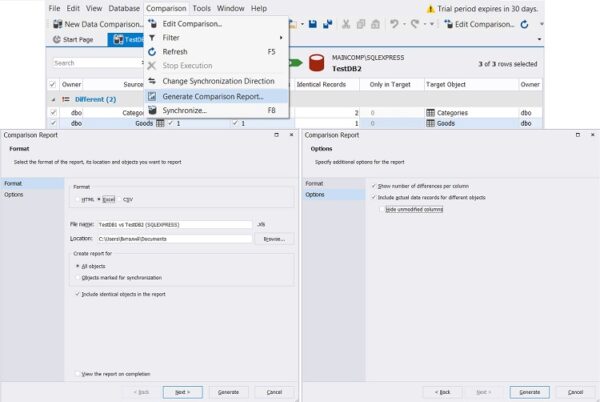
To generate a report and upload to Excel, for example, click “Comparison -> Generate Comparison Report…”.
Then select the format in which you want to generate the report, you can also specify a file name and a directory for uploading. On the next step, you can check the options, click “Generate” to start.
Data Synchronization
We have compared the databases, now if necessary we can automatically synchronize these databases, i.e. TestDB2 make it identical to TestDB1.
To do this, we can click on the green arrow at the top of the program or on the toolbar click “Synchronize”.
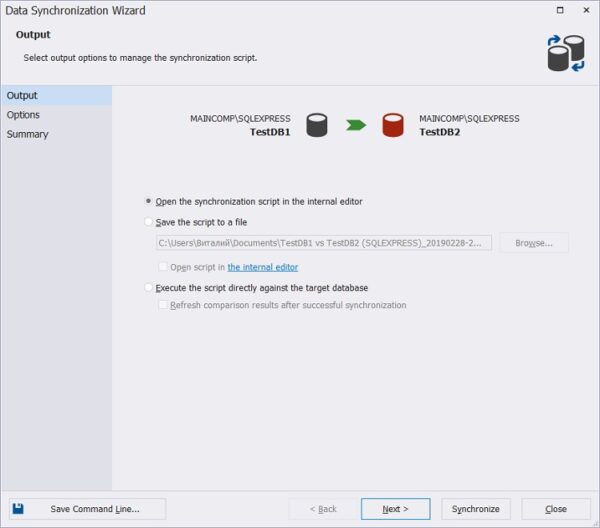
First, we specify the method of script output, we have three ways: open directly in the SQL editor, save to a file, or execute immediately. I will leave it as default, i.e. open it in the same program in a new tab.
Click “Next”.
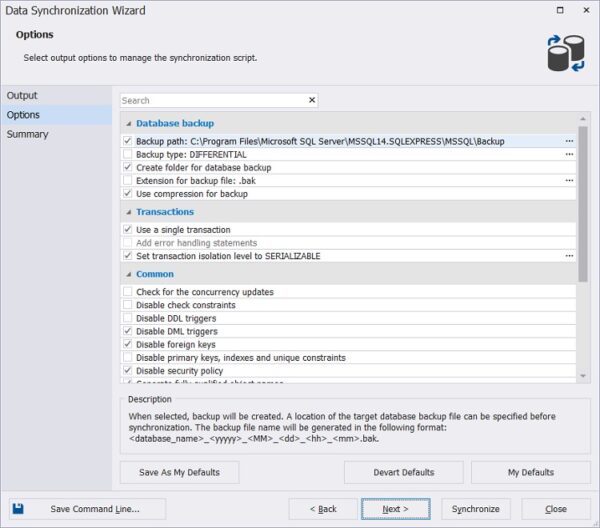
Then specify the synchronization options, the most necessary ones are selected by default, I will leave it by default, click “Next”.
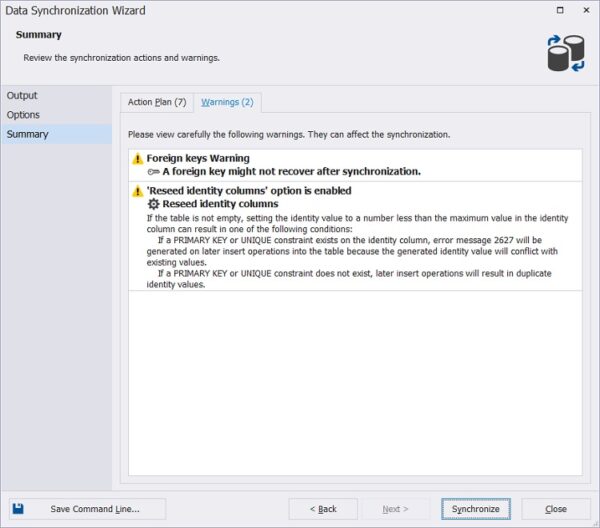
The program dbForge Data Compare for SQL Server will analyze these options and warn you about problems if necessary.
In my case, I am warned that the foreign key may not be recovered after synchronization, and that I have the “Reseed identity columns” option selected, which means that the DBCC CHECKIDENT instruction with the RESEED option will be executed to force a new value to the current ID value on the target database, which can cause problems under certain circumstances. I should say right away that I did not have any problems.
Click “Synchronize”.
After that the program will form the necessary script that synchronizes TestDB2 with TestDB1. To execute it, you can press the “Execute” button.
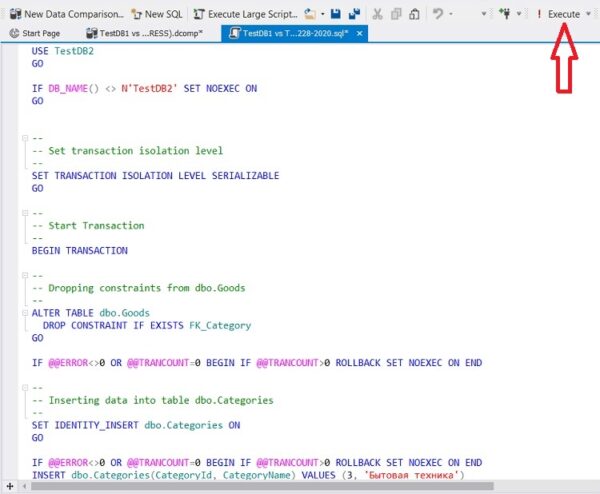
After that, the two databases will be exactly the same.
That’s all I have, I hope the article was useful and interesting for you, bye!
About Enteros
Enteros offers a patented database performance management SaaS platform. It proactively identifies root causes of complex business-impacting database scalability and performance issues across a growing number of clouds, RDBMS, NoSQL, and machine learning database platforms.
The views expressed on this blog are those of the author and do not necessarily reflect the opinions of Enteros Inc. This blog may contain links to the content of third-party sites. By providing such links, Enteros Inc. does not adopt, guarantee, approve, or endorse the information, views, or products available on such sites.
Are you interested in writing for Enteros’ Blog? Please send us a pitch!
RELATED POSTS
Enteros for SaaS: Database Performance Tracking and Cloud FinOps for Scalable Growth
- 25 February 2025
- Database Performance Management
In the fast-evolving world of finance, where banking and insurance sectors rely on massive data streams for real-time decisions, efficient anomaly man…
Enhancing Database Performance in the Education Sector with Enteros: Leveraging RevOps and AIOps for Efficiency and Scalability
In the fast-evolving world of finance, where banking and insurance sectors rely on massive data streams for real-time decisions, efficient anomaly man…
Enteros for Pharma: Cost Estimation, AWS EC2 Performance, and Cloud FinOps for Scalable Operations
In the fast-evolving world of finance, where banking and insurance sectors rely on massive data streams for real-time decisions, efficient anomaly man…
Optimizing Database Performance for RevOps Success in the BFSI Sector with Enteros
In the fast-evolving world of finance, where banking and insurance sectors rely on massive data streams for real-time decisions, efficient anomaly man…