Preamble

To install MongoDB we download one distributed package from the official websitewww.mongodb.com/download/
The official website provides distribution packages for different platforms: Windows, Linux, MacOS, Solaris. And each platform has several distributions available. And there are two types of servers – Community and Enterprise. In this case, you must install the Community version. Although the Enterprise-version has slightly more features, it is only available in trial mode or by subscription.
At the time of writing, the latest version of the platform was version 4.0.4. The use of a particular version may slightly differ from other versions of the MongoDB platform.
To download the necessary functionality, we will select the desired operating system and the appropriate type of package:
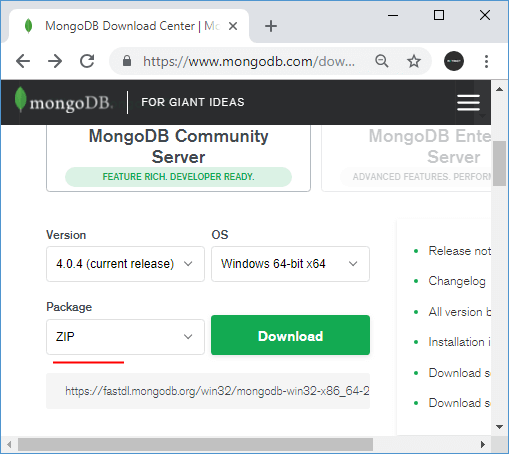
For Windows, you can select the type of package “ZIP”, i.e. load the server as an archive.
If an earlier version of MongoDB was already installed before installation, it must be deleted and all equally created databases must be deleted.
After downloading the archive package, unpack it in the folder C:mongodb.
Contents of MongoDB package
If, after installation, we open the folder C:mongodbbin, we can find there a bunch of applications that perform a role. Let’s take a short look at them.
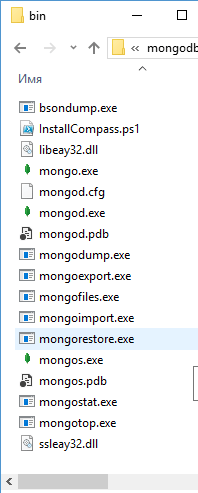
- bsondump: reads the contents of BSON files and converts them into a readable format, e.g. JSON
- mongo: provides a console interface to interact with databases, a kind of console client.
- mongod: MongoDB database server. It handles requests, controls the data format, and performs various operations in the background to manage the databases.
- mongodump: database backup utility
- mongoexport: a utility to export data in JSON, TSV or CSV formats
- mongofiles: a utility to manage files on the GridFS system
- mongoimport: a utility that imports data in JSON, TSV or CSV formats into the MongoDB database.
- mongorestore: allows you to write data from a dump created by mongodump into a new or existing database.
- mongos: a MongoDB routing service that helps process requests and locates data in a MongoDB cluster
- mongorestat: represents the counter of operations with the dd
- mongotop: provides a way to calculate the time spent on read-write operations in the database.
Creating a directory for the database and running MongoDB
After installation, it is necessary to create a directory on your hard disk, which will contain MongoDB databases.
On Windows by default, MongoDB stores databases on the path C:datadb, so if you are using Windows, you need to create a directory. In Linux and MacOS the default directory is /data/db.
If you need to use some other file path then you can pass it on when you run MongoDB in the –dbpath flag.
So, after creating a directory to store the database, you can run the MongoDB server. The server represents the mongod application, which is located in the bin folder. To do this let’s run the command line (in Windows) or the console in Linux and enter the corresponding commands there. For Windows it will look like this:
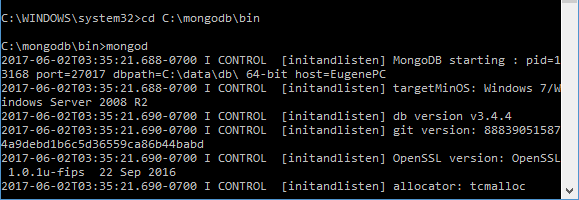
The command line will show us some service information, for example, that the server is running on localhost on port 27017.
And after a successful server start, we will be able to perform database operations through the mongo shell. This shell represents the file mongo.exe, which is located in the installation folder above. Let us run this file:
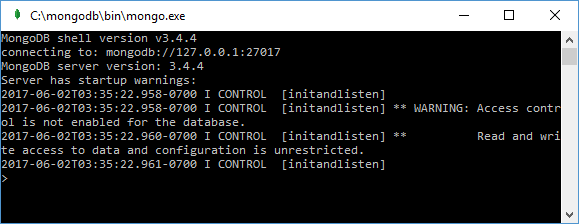
This is a console shell for communication with the server, through which you can manage your data. The second line of this shell is to connect to the mongod server.
Now let’s do some simple steps. Let’s enter the following commands in mongo and after each command-click on Enter:
use test
db.users.save( { name: "Tom" } ) .
db.users.find()
The first command to use the test shall set the test database as the one to be used. Even if there is no such database, it shall be created automatically. Further, db shall represent the current database, i.e. the test database. After db comes to the users – this is the collection, to which we then add a new object. If in SQL we need to create tables beforehand, then the MongoDB collection is created by itself if there are no such databases.
Using the db.users.save() method, the object { name: “Tom” } is added to the test database users collection. The description of the added object is defined in the format you may be familiar with if you have dealt with the JSON format. That is, in this case, the object has a single key “name”, which is matched with the value “Tom”. That is, we add a user with the name Tom.
If the object was successfully added, the console will print the result as a WriteResult expression({“nInserted” : 1 }).
And the third command db.users.find() displays all objects from the test database.
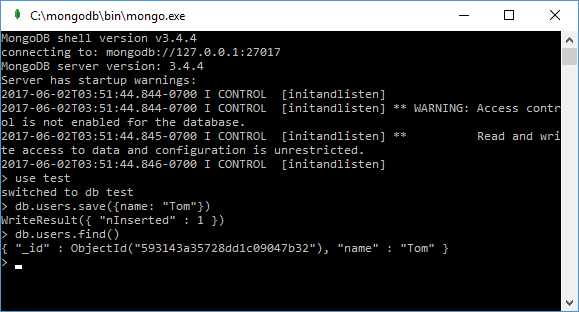
From the output, you can see that some obscure ObjectId field was added to the initial values of the object. As you remember, MongoDB uses the field _id as unique document identifiers. And in this case, ObjectId is the value for the _id identifier.
Installing MongoDB Drivers
Of course, we can also work through the mongo console by adding and displaying objects to the id. But we would also benefit from having mongoDB interact with our applications written in PHP, C++, C#, and other programming languages. And for that purpose, we will need special drivers.
Drivers for such programming languages as PHP, C++, C#, Java, Python, Perl, Ruby, Scala, etc. can be found on the official website at https://docs.mongodb.com/ecosystem/drivers/.
Further, considering the interaction of individual programming languages with MongoDB, we will take a closer look at installation and drivers and all the necessary configuration for specific programming languages.
How to Install MongoDB on Windows 10
Enteros
About Enteros
IT organizations routinely spend days and weeks troubleshooting production database performance issues across multitudes of critical business systems. Fast and reliable resolution of database performance problems by Enteros enables businesses to generate and save millions of direct revenue, minimize waste of employees’ productivity, reduce the number of licenses, servers, and cloud resources and maximize the productivity of the application, database, and IT operations teams.
The views expressed on this blog are those of the author and do not necessarily reflect the opinions of Enteros Inc. This blog may contain links to the content of third-party sites. By providing such links, Enteros Inc. does not adopt, guarantee, approve, or endorse the information, views, or products available on such sites.
Are you interested in writing for Enteros’ Blog? Please send us a pitch!
RELATED POSTS
Maximizing IT Sector Efficiency: How Enteros Enhances Database Optimization, Cloud FinOps, and RevOps Alignment
- 10 April 2025
- Database Performance Management
In the fast-evolving world of finance, where banking and insurance sectors rely on massive data streams for real-time decisions, efficient anomaly man…
Optimizing RevOps and AIOps in the Manufacturing Sector with Enteros Database Performance Platform
In the fast-evolving world of finance, where banking and insurance sectors rely on massive data streams for real-time decisions, efficient anomaly man…
Enhancing Database Performance on Azure Cloud for the Fashion Industry with Enteros
- 9 April 2025
- Database Performance Management
In the fast-evolving world of finance, where banking and insurance sectors rely on massive data streams for real-time decisions, efficient anomaly man…
Enhancing DevOps Efficiency in the E-commerce Sector with Enteros Observability Platform
In the fast-evolving world of finance, where banking and insurance sectors rely on massive data streams for real-time decisions, efficient anomaly man…